Friday, December 30, 2016

Sewing till I drop - En Provence Part 6 & more

I'm in the midst of my yearly holiday break from work, which is a combination of holiday and vacation days.  Now that the Christmas festivities are out of the way, I've had a good 3 days of non-stop sewing!  I have accomplished a LOT.  I made the paper piecing project below, put the binding on two quilts and a table runner, and finished the top of the Arcadia Avenue BOM.  I also finished another row of quilting on my Circle Squares quilt.

I'm teaching a paper piecing class in February and am looking for a good pattern, so I got this one and made it to see if it would be appropriate for my students.  I used only batik scraps (well, I cut into one piece of yardage for the sun) and I love how the colors came out together.  I'm not sure its the best project for my beginner students, so I'm going to think on it for a little while.  This is now basted and ready to go.  I used some fabric I already had for the backing, which makes me feel pretty good!  Using up the stash!

Fabrics for En Provence, Step 6


By Friday morning I was pretty tired from the past 3 days and decided I might not even sew today as I needed some rest.  BUT...then I realized it was FRIDAY and the next step of the En Provence mystery would be out.  I decided I wasn't that tired of sewing after all.  This week's step finally involves the green fabrics.  I have a large bag of green and was able to easily pull out a wide variety I felt would look good in the quilt.  Some are a little bright, but I'm hoping it will all come together in the end.

I'm struggling on the lavender though.  I have enough, but am trying to get more variety in there. I pulled in two colors I previously thought were too bright.  I also added in a really nice batik from a quilt I just finished.  I didn't want to cut up many of those scraps because I have plans for the remainder, but hey, nothing is sacred...cut cut cut!  Here are my 64 finished blocks, all trimmed and pretty.  I moved my needle one step to the right so that I could trim these up. I knew they'd be just a tad too small otherwise.  My container is filling up and I'm getting excited to see what these blocks are going to look like!

As I mentioned, I've got a TON going on in my sewing room right now.  My kitties are loving it. Here are some pictures of Freddie (orange tabby) and Raha snuggling up while I'm trying to quilt my Circle Squares quilt.


As I was trying to lay out and finish the top on the Arcadia Avenue BOM, Daisy & Tahnoon had a BLAST with part of the quilt top.  After chasing them off I was able to finish it...FINALLY!!!!!  Now ready to baste and quilt.


Voila! Arcadia Avenue BOM top complete!


Saturday, December 24, 2016

A Very Dirty Girl - En Provence Mystery Part 5 & More

Jumping right into the subject of my post....In August I returned to the US after a year long work assignment in UAE.  I've been sewing almost non-stop since.  Since I'm trying to make up for a year of not working on my projects, it doesn't really seem like I've done that much sewing.  I figured it had been enough and decided to clean out under my throat plate.  Yikes!!!  that's a lot of lint!!  How was my machine even sewing properly???  I guess 3.5 months is too long to go between cleanings.  Maybe I'll put a reminder on my 2017 calendar to clean it every month.  I can't be the only one that waits too long, am I?  With my machine nice and clean I could continue sewing and get caught up with the En Provence Mystery.  
More purple (yay!) and only 64 HST to make. This one was a piece of cake.  I don't have the Bonnie Hunter ruler, but after looking it up on-line I realized the Easy Angle ruler is almost the same thing (there are benefits to being a gadget hoarder).  I'm running out of variety in my dark purples, especially since these pieces needed to be larger (3.5" strips).  My neutrals are getting a little repetitive as well, though, I did recently add in this awesome cream and metallic gold cat fabric.  This was one of my estate sale finds and I have YARDS of it.  I just love it!  I also found another piece of light tan blender on my shelf which I've just now added in to the neutrals mix. I'm sure it will all come out fine in the end.  I'm caught up and really enjoying this mystery (probably because of the purple!).


While I wait I need some other stuff to work on.  I have a total of 22 days off from work during this holiday season and I'm making every effort to make the most of it!

A large, complicated paper piecing project is a great way to suck up huge amounts of sewing time.  Luckily I have such a project at hand.  I finally completed the last two blocks in the Sassafras Lane, Arcadia Avenue BOM.  Block 11 wasn't so bad, but Block 12 was a bit of a time suck with 16 pieces per section and little tiny ones at that.

Block 11 - Arcadia Avenue BOM
Ready to go, Block 12 - Arcadia Avenue BOM
Block 12, the last seam! - Arcadia Avenue BOM
Block 12 - FINISHED AT LAST!
I love how the blocks look together!  LOVE!  After finishing the blocks I was dying to get a preview of what the finished quilt is going to look like. I immediately started working on the background.  I finished the top and bottom borders and all the setting triangles last night and  had to lay it out.  It was a challenge to keep the kitties off it long enough to get it laid out and snap a photo.  They finally got their chance to get their paws on it...too cute.  The quilt is ready to be sewn together, then I can begin phase two of the time suck that is this quilt when I start to quilt this.  I plan to finish this by April so it can go in my local guild quilt show.  Wish me luck!! To link up to Bonnie Hunter's En Provence Mystery, click here.
Arcadia Avenue BOM - Setting Complete, ready to sew together.
Kitties ALWAYS need to sit on the quilt blocks...ALWAYS.
Lucifer 2 loves quilts!

Sunday, December 18, 2016

My UFO Log - What's currently in my Sewing & Quilting Que


I haven't done this since 2014 and was inspired by one of my quilting friends.  Not so surprisingly, I've only finished 3 of he 9 projects which I wrote about back in 2014.   I've got a lot going on (as always).  I won't talk about ALL the projects I have in process, just the ones which are actively being worked.

I'm still plugging away at the Arcadia Avenue BOM.  Here is the completed Block 8. Only 4 more to go and I can start putting the quilt together.  I plan to quilt this myself, so that's going to be quite the endeavor I'm sure.  I'm envisioning a nightmare with all those bulky seams coming together.

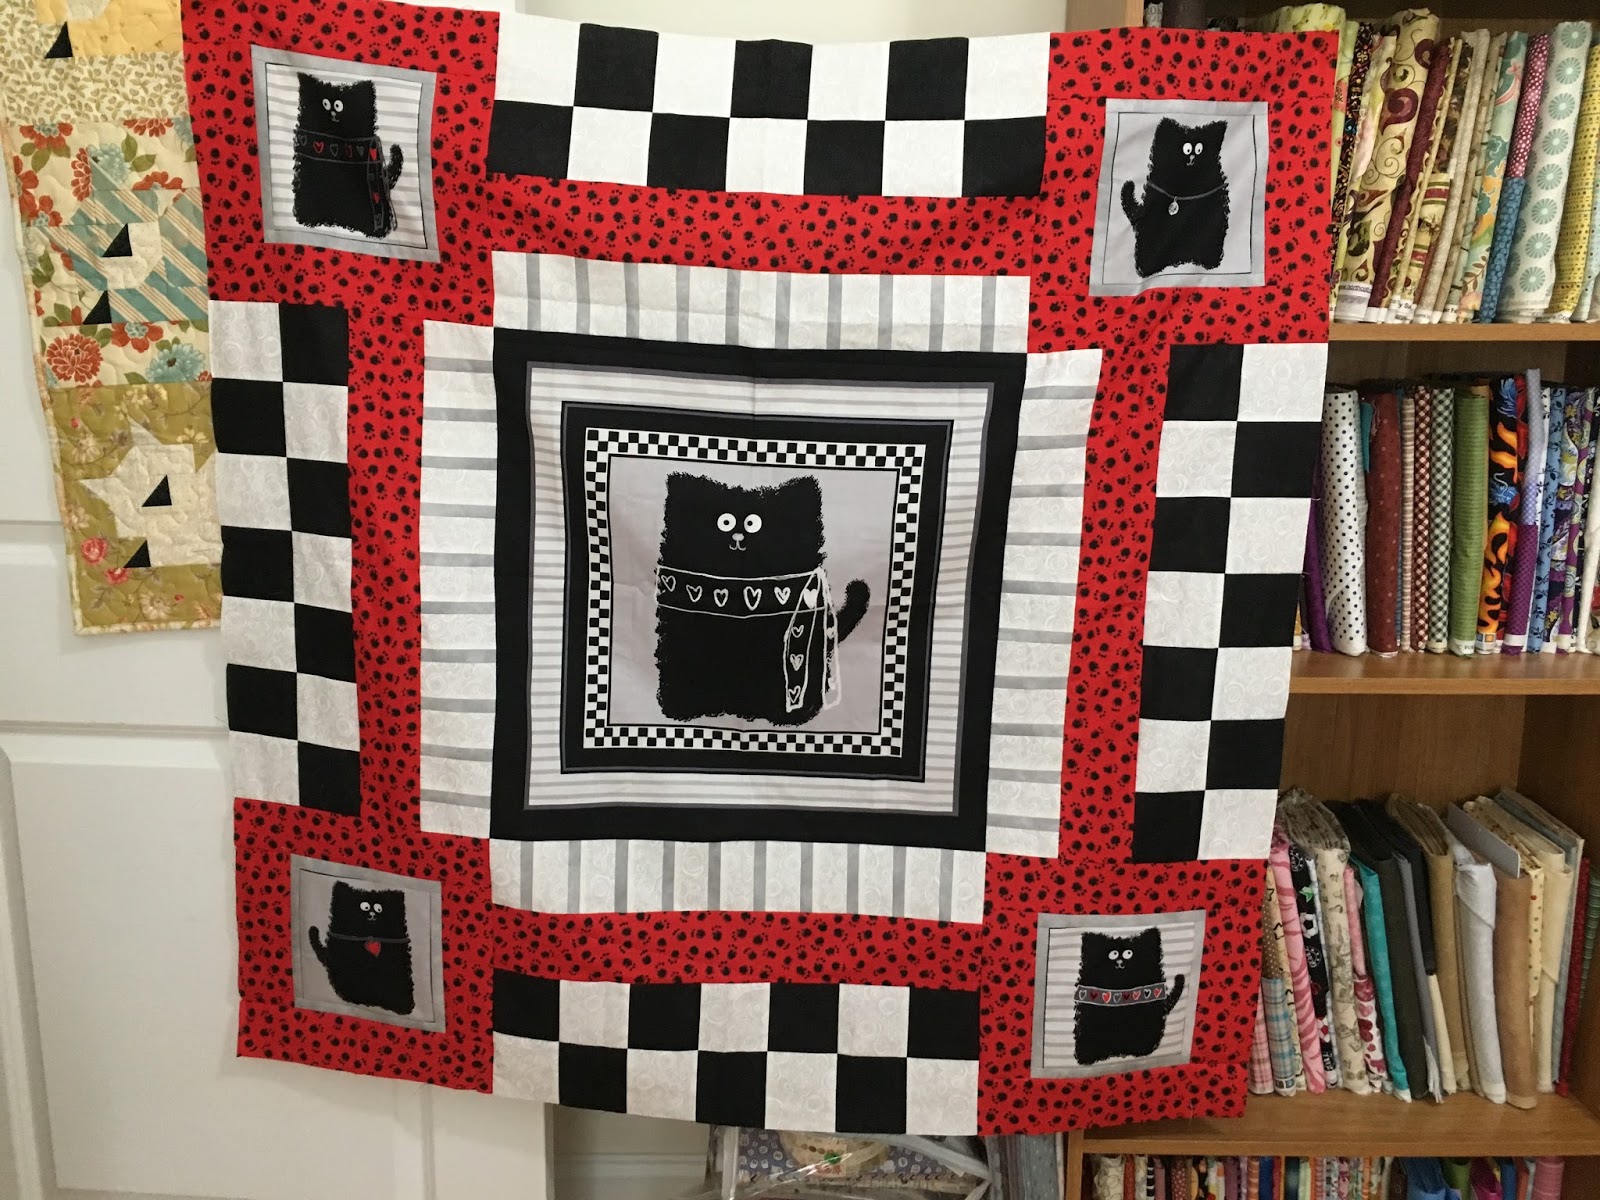
I have several items to bind, including my Smudgy Cat panel quilt.  I love this adorable little cat.  I'm  not sure what I'm going to do with the quilt yet.  I used wool batting for the first time in this quilt and it was interesting.  Its much different to work with than cotton or polyester.  It is stiffer in some way, so moving the quilt around was trickier.  It was a good quilt to learn on though.  I didn't get too fancy with the quilting as I was struggling a little with my machine tension and the batting. This was a project I just wanted to be finished.

I also have to add the binding and a hanging sleeve to the quilt shown on my quilting machine below.  This is the Sew-Together Quilt Shop block of the month for 2014/2015.  I fully custom quilted it and plan to put it in the Tewksbury Piecemaker's quilt show this April.  That deadline gives me "plenty" of time to get the binding and sleeve on it!
 
I also have a table runner to complete the binding on.  I made this from scraps from the quilt I gave to my house sitter.  After the struggle with the Smudgy Cat quilt, I needed something to quilt that I could claim an easy victory on.  I did continuous curve and a ton of ribbon candy on this.  I also did a nice motif in the center of each square.  I was able to dial in my tension and this came out great.  I'm not sure who its going to, but it will be good to have it around for when I need a housewarming gift or something.  I used King Tut, Sands of Time color, thread with tan deco bob for the bobbin.  I'll probably do all the binding at one time, so when I get ready to do it, I'll just go to town.

In addition to the Bonnie Hunter En Provence Mystery, which I've posted about several times, I'm working on the Mystery quilt for my guild.  I was able to use fabric from my stash to build the throw size version of the mystery.  I'm super happy to be using my stash.  I've had this fabric 5 or 6 years.

The final project I'm actively working on is my Circle Squares quilt.  I bought this kit is CA while on a business trip and think its the most happy, adorable quilt.  This quilt was screaming at me to custom quilt it, so that's what I'm doing. I put wool batting in this as well because I really wanted to see that puff factor.  I'm having much less trouble manipulating this quilt than I did the Smudgy Cat one.  I'm using Fabulux, Springtime color, thread on this with white deco bob for the bobbin.  The thread has green, purple and yellow.  I love how the thread looks on this.  Its happy and bright and really goes with the colors in the quilt without taking away from it.  I was considering switching thread for every diagonal row, but have since decided just to stick with the Springtime thread.


In the areas between the circle blocks I'm quilting this continuous curve shape with a set of circles in the middle.  I wanted the circle blocks to really stand out as a circle, so after a little trial and error I came up with the design below.  I started with a straight line, 8 pointed star on the outside and connected the points with a double set of arcs.  In the center I put pumpkin seeds and filled in the extra spaces with swirls. I really think the center fills in the space and give it a great sense of being a circle.  This doesn't take too long to quilt either.  Now that I'm several deep, I'm getting faster, I've also got all my ruler sizes down and the trial and error phase is hopefully over.


I've completed one full row, only 8 more to go!!  I'll be finished in no time....ha!  I love how this thread seems so bold up close but when you look at the whole quilt its not overwhelming at all.  


Staying Caught Up - En Provence Mystery - Part 4


In my last post I said I was finished with part 3, but I hadn't actually finished, so here are the pictures of the remainder of my in-process and finished purple 4 patches.  PURRRRPLE

I love a nice organized bucket of pieces.....how pretty.

On to Part 4...more purple (80 purple and neutral triangle-in-a-square units to be exact)!!! I came home from work Friday and went straight to work on the newest units.  I'm getting a little nervous as I feel like I"m running out of dark purples.   I have enough, but want to make sure I keep the variety up.  I don't want to have too much of any one thing.


I was able to make the neutrals using 10 different fabrics (8 of each).  I scanned through my yardage bookshelves and actually found a really nice piece of dark purple I had gotten at an estate sale that I hadn't noticed before (I guess it was tucked behind something a little).  This was a great find as it will add some nice variety in there.  Here are my pieces all cut and ready to go and another picture of all of them chained together.  I love chains!!!!!


After pressing and trimming all 80 of my newest units I'm finally caught up.  I'm loving this mystery so much because of the colors. I can't wait to see how the blocks end up.  If its anything like the other  Bonnie Hunter Mysteries, I know its going to be gorgeous!  If you want to see what else I've got going on, check out this post.  You can get back to Bonnie's Mystery page here.


Saturday, December 10, 2016

Digging Deeper...En Provence Part 2 & 3

After only getting 40% of the neutral 4 patches I needed on my first trip through the scrap bin, I dug deeper and got within 12 sets away from the required 221.  I'd consider that a pretty good 2nd effort.
2nd Trip to the scrap bins
Kite tails ready to be cut and pressed
This is what my "kite tails" looked like for the 2nd batch of 4 patches.  On the right are my 221 finished 4 patches.  Whew! Step 1 complete!                                  I had to include this photo of little Lucifer2 (long story) sitting on a stack of quilts like the Princess and the pea.  My babies love to hang out in the sewing room with me.

Lucifer2 loves this pile of soft quilts

 On to Step 2 of the mystery quilt.  What was I going to use for the magenta?  It was recommended to use yardage.  I don't have a lot of cuts larger than a yard.  I hoped I had something.  Luckily I found the PERFECT fabric.  I had 1 3/4 yards, so plenty to spare, and I LOVE how it looks.  Its going to be the perfect pop of color!  The reason I'm so excited about this is usually when I need a fabric something pops to mind because I know my stash really well.  This fabric was with my yardage and I have no idea where I got it or when, which is very unusual.  I was giddy the entire time making the triangle squares. Love Love Love!
100 Triangle Squares!


Nobody likes trimming blocks after they're done, but in this case it was definitely needed.  Luckily I have the Quilt in a Day triangle square tool which made the job really easy and I was sure I was trimming them properly so my points come out great in the finished quilt.  As you can see I've got a nice pile of trimmings.  Each block isn't that much off, but I had left the blocks as-is all this combined inaccuracy would have effected the quality of my quilt appearance.  I ended up working late into the night to finish Step 2 because I was having so much fun with that magenta fabric.
After trimming with the Quilt in a Day triangle square tool
Even though it was pretty late at night, the next step involved PURPLE (my favorite color).  I actually don't use purple that often in my quilts, and when I saw the 4 patches were completely made from purple (light & dark) I had to "press" on.  I have a full gallon bag of purple scraps, so I thought getting what I needed for the 168 units would be a piece of cake....wrong!  I didn't want to use colors too different in tone (i.e. red purples vs. blue purples, bright vs. muted, etc) so I was somewhat limited.  I cut and sewed up what I thought would be plenty and ended up with 69 units (only 41% of what I needed).  Time to dig even deeper.......
69 Four patch units.

1/2 the trash can filled after steps 2 & part of 3
It was well past 2 am when I finished the first set of purple 4 patches.  I didn't have the energy to finish, but I decided to put a little effort into digging through my stash before calling it a night.  I cut a bunch of purples I didn't feel matched the scheme I was going for and went to bed.  I am really resolved not to buy any fabric to make this quilt top.  I'm glad I stopped before I went further because I probably would have been very disappointed with the quilt if had I used them.  In the morning I went digging even DEEPER and dug out my batik scraps.  I figure there's no rule against throwing a few batiks in there.  If they're the right colors, they'll blend right in with everything else.  I was able to get enough fabrics to finally finish the last units!  I'm caught up with the mystery with time to spare!  In addition to having some major fun going from the AWESOME magenta in Step 2 to the PURPLE in Step 3, working with the purples was made even more fun by the fact that I used some fabric from the first quilt I ever made (top and backing).  I had to chuckle when I went to cut the fabrics and realized they were folded such that I had cut them along the length of the fabric,  not the width.  Back in my early days I had no idea even how to cut my fabric properly!  I also had to use a TON more yardage than the pattern said because I was trying to make my log cabin blocks of out these short pieces that were cut along the length I bought.

My first quilt!! Shadowfax performs an in-process inspection
The last little bits from my first quilt backing
I do have a little sadness in using up some of those fabrics from my first quilt.  Especially the backing.  I chose a great dark purple batik.  I've used the leftovers in several things and this is all that's left.  These pieces are pretty small.  I'm not going to get much more life out of them.  Its the end of an era, but I guess that's what scrap busting is all about.  I will appreciate this fabric in the quilts I create with it more than if it is sitting in my closet.

Tuesday, December 6, 2016

I want to throw all my fabric away.....

Well, that's an attention grabbing title.  Let me explain.  What I really meant was that I want to make a scrap quit (or 20).

Making scrap quilts takes me way outside my comfort zone.  I like things to match.  I'm a sucker for coordinated fabrics and usually even have a matching backing from the quilt's fabric collection.  This means my scraps keep growing and growing.  I currently have a scrap stash that takes up a set of bins that are 20" wide and taller than I am.

Most of my scraps are sorted by fabric collection (if there are enough left that I feel I can make an entire project from it).  These I consider somewhat sacred.  If I use these I want to make sure I have as much as possible and don't run out one square from finishing a project.  Then there are the non-collection based ones which are sorted by color.  Two of my friends and I made scrap quilts from the color scrap stash we didn't even make a dent.

Well, its time to use some up and make room for more...there are always more.  I've decided to take part in Bonnie Hunter's En Provence scrap mystery quilt.  The color scheme is a little scary, but I'm trusting Bonnie that it will work out beautifully in the end.

I set up a few "rules" for myself, partially to give myself that extra push to dig deep into that scrap stash.  I'm not going to plan out my fabrics too much in advance.  I know I have plenty of all the recommended colors to make the quilt, so I'm going to choose fabrics as I go.  I've also been telling myself that "nothing is sacred".  This means I'll be dipping into my coordinated fabric collection scraps to get just what I need and make sure I have enough variety.  This is hard, real hard and I can't cut into them without discretion, but I keep saying "nothing is sacred" and have cut up some.  I also made a couple rules about the remaining cut bits of my scraps that I'll get to later.

Clue 1 involves making 221 neutral 4 patches.  I dug into my pile and cut and cut and cut what I thought would make the required number of 4 patches.  Ha ha.  Once all sewn together I had 89, which is only 40% of what I need.  I redoubled my effort and pulled out every single fabric collection bag.  I cut and cut some more and am hoping I have enough this time.
First pile I thought would make 221 four patches. Ha!

I was able to make only 89 on my first try :(

 Now we get to the explanation for my blog post title.  The part about this scrap-busting process that makes me happy is that I've used up the remainders of many fabrics.  The hoarder in me is a a little sad that I won't have them to use again, but on the flip side, my stash has taken over WAY too much space and I can't enjoy my fabric, which makes me unhappy.  I'm happily using up fabrics and throwing anything away that's less than 2' square.  Normally I'd save smaller pieces, but if I've cut it down and its now smaller than 2" square its going in the trash.
Super Happy for these scraps in the trash!


Friday, October 28, 2016

Whew!  Its been well over a year since I posted, And a busy year+ it has been!  I took a work assignment in Abu Dhabi, UAE in late July 2015 and just returned home August 10th, 2016.  My work schedule was stressful and grueling and despite taking three large boxes of my sewing supplies I only made one set of placemats and part of a table topper the entire time.  My creative juices were NOT flowing at all.  I did meet this nice camel while attending a polo match and enjoyed the "lovely" balmy feel of many  84+% humidity nights.


Enough about that, let's talk about all the fun stuff I've gotten back into since I returned!!  I took a month off work since I hadn't used any vacation in over a year.  I rested, got back into the gym, did projects around the house and also worked on a few quilting projects.

Though I didn't come home with many completed sewing projects, I did come home with 6 more cats than I went to UAE with.  Its a long story, but suffice to say, these cats have sooo much more opportunity here to have loving families than they would have if they hadn't met me and been brought to the US.  Three of the 6 have been adopted, so my clan is down to what I believe to be a manageable number of 5.  Here are some photos of the gang enjoying my quilti-ness.

Sewing is tiring work
Kittens chilling in my scraps

How many cats can fit in one basket?
Can you let me finish it first?

         You made this for me, right?

Alright, on to the quilting projects.  Since August 10th, I've completed a bunch of items including the following (in no particular order):

Paper pieced Christmas wreath
This is a paper pieced wall hanging I made as a teaching sample shop.  I got back to teaching October 15th.   I pieced and quilted this in two days!


Circle Square Quilt from the Orange Quilt Bee


My new assignment at work has me traveling quite a bit as most of my team is based in California.  I did a little shopping at the local quilt shops while I was there for a two week trip and decided I could not spend a weekend without sewing so I went out and bought a machine along with all the basic supplies.  My hotel room was officially turned into a quilting studio and I finished two quilt tops while there.  I left the machine and all the supplies in my office in CA awaiting my return.

Smudgy Cat panel quilt
Thank You Quilt for my house sitter
I wanted to make a quilt for the friend who babysat our house for over a year.  He was a saint.  Deathly allergic to cats but due to a snafu he had to live with my cats for a month until they could fly out to be with us in Abu Dhabi.  He has his own house now and I thought this quilt would make a great thank you/housewarming gift.  Of course I washed, dried and then hid this quilt from the cats before gifting it.

I've been dabbling with pattern design and this quilt is  the second one I've made from the non-released Lickety Split Log Cabin pattern.  The pattern still has a few kinks I need to work out before publishing, but this quilt came out great and the cats of course like it.  The pattern works great if you have a jelly roll with approximately equal numbers of light and dark strips.  I'm trying to find a way to make the pattern work as nicely for a more varied group of strips.
Lickety Split Log Cabin


During my month off I decided to invest some time in getting back to my Sweet Sixteen quilting machine.  I purchased several Craftsy classes and hunkered down.  The practice sandwiches you see here are from Patsy Thompson's feather class.  I learned a TON and had a lot of fun.  The bag the sandwiches are in is another project.  Its basically three pieces of vinyl with a zipper in the middle and binding all the way around.  A great way to use up scraps and I find this bag much nicer than using zip locks.  I plan to make a lot more of these.

Hand made project back and practice quilt sandwiches
  
Freddie helps me cut out my guild mystery quilt.
 I also did something else I didn't think I would do....I joined the local quilt guild.  I'm participating in the guild's mystery quilt which is all cut out and ready for sewing.  Cutting is exhausting work as you can see.
Craftsy BoM is COMPLETE!!!
The project I'm happiest to be done with is the 2012 Craftsy Block of the Month.  I made the quilt in 2012 with both black and white backgrounds.  I waited a while to start quilting this until I got "good enough".  I had quilted about 6 blocks prior to my trip to UAE.  I was driven to finish this quilt because I have several others waiting patiently in line. I worked hard and used the remainder of the quilting as an opportunity to practice the techniques I've recently learned. I'm pretty happy with how it came out and have a lot of things I want to do differently on the black version.  I've included pictures below of each of the blocks I quilted since I got back home.  I quilted the sashing with a ribbon candy design and put feathers around the outer border.